AWS亚马逊服务器搭建VPN
时间:2024-04-15 09:35:18 来源:网络cs 作者:淼淼 栏目:卖家故事 阅读:26
一、AWS EC2搭建L2TP/IPSec VPN服务器
AWS针对新注册的用户提供一年免费EC2服务。Amazon EC2有一定限制,一个月流量限制不超过15G。
设置提醒,防止超出限制多扣费。
关于IPsec VPN可参考:https://github.com/hwdsl2/setup-ipsec-vpn/blob/master/README-zh.md
二、AWS亚马逊服务器搭建VPN
来源:AWS亚马逊服务器搭建VPN - ACE VPN
以前在免费的亚马逊服务器上搭建过Shadowsocks程序,稳定性和速度还算不错,但也有局限性,比如 Bash终端无法翻墙搭建vpn服务器,部分不支持大理的软件无法翻墙出去,所以就打算在服务器上在搭建一个VPN。
目前可用的开源VPN服务器端有IPSec、L2TP/IPSec和PPTP。PPTP由于安全性等因素已被IOS抛弃,所以打算安装L2TP/IPSec。L2TP/IPSec的安装和Shadowsocks相比较为简单,但要使用配置起来要比Shadowsocks繁琐了很多。
安装
服务器环境:
亚马逊免费服务器 Ubuntu12.04
安装必备的软件包搭建vpn服务器,L2TP/IPSec所需要的就三个软件,命令搞定:
sudo apt-get install openswan ppp xl2tpd配置1.修改Ipsec的配置文件
打开配置文件
sudo vim /etc/ipsec.conf修改配置文件
# /etc/ipsec.conf - Openswan IPsec configuration file# This file: /usr/share/doc/openswan/ipsec.conf-sample## Manual: ipsec.conf.5version 2.0 # conforms to second version of ipsec.conf specification# basic configurationconfig setup # Do not set debug options to debug configuration issues! # plutodebug / klipsdebug = "all", "none" or a combation from below: # "raw crypt parsing emitting control klips pfkey natt x509 dpd private" # eg: # plutodebug="control parsing" # Again: only enable plutodebug or klipsdebug when asked by a developer # # enable to get logs per-peer # plutoopts="--perpeerlog" # # Enable core dumps (might require system changes, like ulimit -C) # This is required for abrtd to work properly # Note: incorrect SElinux policies might prevent pluto writing the core dumpdir=/var/run/pluto/ # # NAT-TRAVERSAL support, see README.NAT-Traversal nat_traversal=yes # exclude networks used on server side by adding %v4:!a.b.c.0/24 # It seems that T-Mobile in the US and Rogers/Fido in Canada are # using 25/8 as "private" address space on their 3G network. # This range has not been announced via BGP (at least upto 2010-12-21) virtual_private=%v4:10.0.0.0/8,%v4:192.168.0.0/16,%v4:172.16.0.0/12,%v4:25.0.0.0/8,%v6:fd00::/8,%v6:fe80::/10 # OE is now off by default. Uncomment and change to on, to enable. oe=off # which IPsec stack to use. auto will try netkey, then klips then mast protostack=netkey # Use this to log to a file, or disable logging on embedded systems (like openwrt) #plutostderrlog=/dev/null# Add connections here# sample VPN connection# for more examples, see /etc/ipsec.d/examples/#conn sample# # Left security gateway, subnet behind it, nexthop toward right.# left=10.0.0.1# leftsubnet=172.16.0.0/24# leftnexthop=10.22.33.44# # Right security gateway, subnet behind it, nexthop toward left.# right=10.12.12.1# rightsubnet=192.168.0.0/24# rightnexthop=10.101.102.103# # To authorize this connection, but not actually start it, # # at startup, uncomment this.# #auto=addconn L2TP-PSK-NAK rightsubnet=vhost:%priv also=L2TP-PAK-noNATconn L2TP-PSK-noNAT authby=secret pfs=no auto=add keyingtries=3 rekey=no ikelifetime=8h keylife=1h type=transport left=*.*.*.*(此处填服务器内网地址) leftprotoport=17/1701 right=%any rightprotoport=17/%any dpddelay=40 dpdtimeout=130 dpdaction=clear这份文件主要修改原来配置中的protostack=netkey
以及加入conn L2TP-PSK-NAK和conn L2TP-PSK-noNAT的配置即可,注意left=…(此处填服务器内网地址)
2.修改Ipsec的Secrets
打开配置文件
sudo vim /etc/ipsec.secrets 修改配置文件
# This file holds shared secrets or RSA private keys for inter-Pluto# authentication. See ipsec_pluto(8) manpage, and HTML documentation.# RSA private key for this host, authenticating it to any other host# which knows the public part. Suitable public keys, for ipsec.conf, DNS,# or configuration of other implementations, can be extracted conveniently# with "ipsec showhostkey".# this file is managed with debconf and will contain the automatically created RSA keysinclude /var/lib/openswan/ipsec.secrets.incx.x.x.x(此处填你的服务器内网地址) %any: PSK "预共享密钥"⚠️这份文件x.x.x.x处改成你的服务器内网地址,PSK后修改你自己的预共享密钥(需记住),后续连接过程中要用
3.关闭网卡部分功能
由于IPSec工作时可能会与网络接口的send_redirects和accept_redirects功能相冲突,因此需要在启动IPSec前将网卡的这些功能关闭。运行:
echo 0 > /proc/sys/net/ipv4/conf/eth0/send_redirectsecho 0 > /proc/sys/net/ipv4/conf/eth0/accept_redirects这一步如果提示权限不足,建议 将指令写入 sh文件,sudo运行该文件即可。
touch disableeth0.shvim disableeth0.sh然后写入:
#!/bin/bash# Disable send redirectsecho 0 > /proc/sys/net/ipv4/conf/eth0/send_redirectsecho 0 > /proc/sys/net/ipv4/conf/eth0/accept_redirects 赋予可执行权限,并执行:
chmod +x disableeth0.sh./disableeth0.sh4.重启ipsec服务并检查其是否正常工作
执行
sudo service ipsec restartsudo ipsec verify这时候你会看到程序自检了:
Checking your system to see if IPsec got installed and started correctly:Version check and ipsec on-path [OK]Linux Openswan U2.6.38/K3.13.0-92-generic (netkey)Checking for IPsec support in kernel [OK]SAref kernel support [N/A]NETKEY: Testing XFRM related proc values [OK] [OK] [OK]Checking that pluto is running [OK]Pluto listening for IKE on udp 500 [OK]Pluto listening for NAT-T on udp 4500 [OK]Checking for 'ip' command [OK]Checking /bin/sh is not /bin/dash [WARNING]Checking for 'iptables' command [OK]Opportunistic Encryption Support [DISABLED]第三项、倒数第一项和第二项不用去理会,如果你的结果和我一样了,恭喜Ipsec的配置算是完成了,如果没有请仔细检查上述配置哪边没有配好。
5.修改xl2tpd的配置文件
打开配置文件:
sudo vim /etc/xl2tpd/xl2tpd.conf在文件末尾添加:
[global]ipsec saref = yes[lns default]ip range = x.x.x.x-x.x.x.xlocal ip = x.x.x.xrefuse chap = yesrefuse pap = yesrequire authentication = yesname = OpenswanVPNppp debug = yespppoptfile = /etc/ppp/options.xl2tpdlength bit = yes其中
local ip后面x.x.x.x处改成你的服务器内网地址
ip range后面x.x.x.x-x.x.x.x处改成可使用的服务器内网ip地址段,如果你的服务器内网ip是 10.12.13.10,那此处你可填写 10.12.13.11-10.12.13.50,修改ip的末尾数字即可(不要把自己的ip段包含在内)
6.修改ppp配置文件
修改(新建)配置文件 /etc/ppp/options.xl2tpd
sudo vim /etc/ppp/options.xl2tpd添加下列内容:
require-mschap-v2ms-dns 8.8.8.8ms-dns 8.8.4.4authmtu 1200mru 1000crtsctshide-passwordmodemname l2tpdproxyarp7.设置vpn客户端用户名密码
由于使用ms-chap-v2认证,修改配置文件 /etc/ppp/chap-secrets
sudo vim /etc/ppp/chap-secrets格式如下:
# client server secret IP addresses用户名 l2tpd 密码 *其中server和IP addresses不变,其余字段用户自定义,这是客户端用来连接的用户名密码
8.开启ip转发
打开配置文件
sudo vim /etc/sysctl.conf在文件末尾添加
net.ipv4.ip_forward = 1net.ipv4.conf.default.rp_filter = 0net.ipv4.conf.default.accept_source_route = 0net.ipv4.conf.all.send_redirects = 0net.ipv4.conf.default.send_redirects = 0net.ipv4.icmp_ignore_bogus_error_responses = 19.加载系统配置
命令行执行
sysctl -p10.设置转发规则
命令行执行
iptables -t nat -A POSTROUTING -j MASQUERADE11.(非必需)修改启动脚本
因为上述步骤,在系统重启后会被重置,因此可选在在启动脚本加入配置
打开配置文件
sudo vim /etc/rc.local在尾端添加
iptables –table nat –append POSTROUTING –jump MASQUERADEecho 1 > /proc/sys/net/ipv4/ip_forwardfor each in /proc/sys/net/ipv4/conf/*doecho 0 > $each/accept_redirectsecho 0 > $each/send_redirectsdone12.重启相关服务
命令行执行
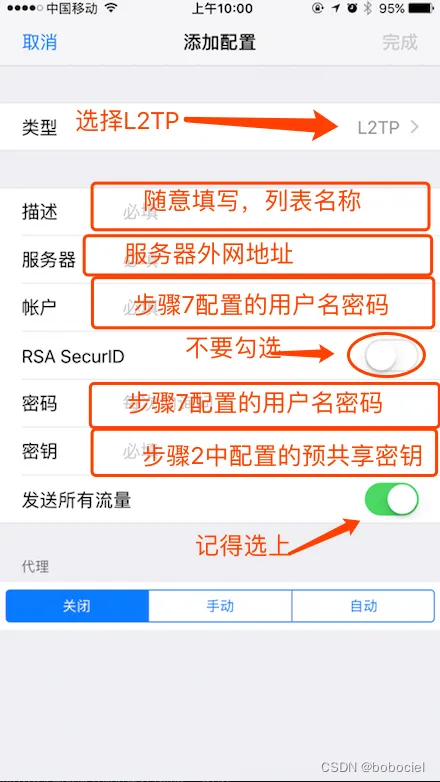
/etc/init.d/pppd-dns restartsudo /etc/init.d/xl2tpd restartsudo /etc/init.d/ipsec restart13.客户端配置iphone配置如下
本文链接:https://www.kjpai.cn/gushi/2024-04-15/158830.html,文章来源:网络cs,作者:淼淼,版权归作者所有,如需转载请注明来源和作者,否则将追究法律责任!
上一篇:毕业设计:基于深度学习的电商评论情感分析系统 人工智能
下一篇:返回列表